
Today, we will learn how to empty shark vacuums.
Today we are going to explore how to empty, clean, and completely take apart a Shark Vacuum Cleaner.
Shark Vacuums are some of the easiest and most efficient models on the market and can clean a wide variety of surfaces: not only are they efficient at cleaning, but they are also one of the most reliable models that can tackle all types of areas, as well as pick up a wide variety of garbage, including pet hair.
But how are they at being taken apart for a quick fix or a super speedy clean? The last thing you want is to have to fiddle around with a model that is difficult to put back together.
Here’s our step-by-step guide to remove any difficulties in navigating your Shark Vacuum Cleaner.
How Do You Know When A Shark Vacuum Will Need Cleaning?

Like many models of vacuum cleaners, some telltale signs will indicate when you should pull apart your vacuum cleaner and begin to clean it down.
One of those times is that the performance of the vacuum cleaner becomes compromised and it’s likely down to the fact it has become clogged with dust and debris.
A clear indicator is that debris that used to be simple to suck up now takes a few goes to complete, and it is clear from the suction power that things are not as efficient as they could be.
If you consistently leave them behind on the floor your Shark Vacuum likely needs a little TLC.
One other clear sign is if your vacuum cleaner is starting to make some other noises that you haven’t noticed before. This is an indication that the vacuum is clogged.
To support this, it might be worth smelling the air that is being pumped out, as often it is easy to spot because there will be a foul smell emitting from the vacuum.
How To Empty Shark Vacuums
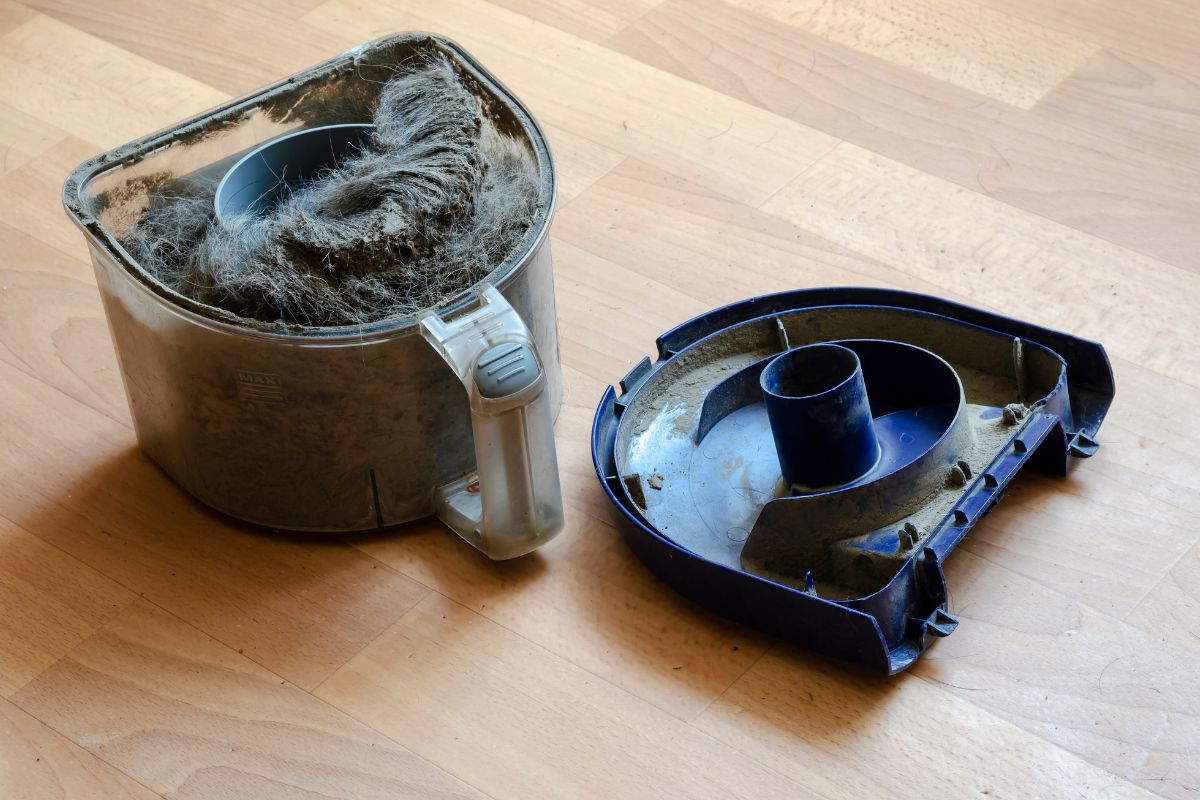
The first thing to note is that shark vacuums typically use a plastic dustbin to contain the dirt and debris as opposed to Disposable bags.
While the good news is you won’t need to purchase new bags, you will need to consistently empty the dustbin on the vacuum at regular intervals to avoid many of the issues occurring we have just listed above.
Shark Vacuum recommendations for how often to empty the dustbin after every use, and we would certainly stick to this if you are vacuuming in a large area.
Though if you are only vacuuming a small patch, you may not need to do this every time.
Here are the steps to emptying your Shark Vacuum:
1. Make sure your shark vacuum is turned off and unplug it from any electrical source. This is to ensure your own safety when handling the vacuum.
2. Take a grasp of the handle which is located at the top of the vacuum dustbin.
3. Press the button at the front of the handle and as you do this begin to pull the dustbin up away from the main body of the vacuum.
4. Transport the dustbin over to a trash can or bag you wish to dispose of the debris.
5. You should be able to see a button that is located on the side of the dustbin, typically located near the bottom of the bin. Press this button which will result in the bottom of the beam opening up which will release the dirt and debris into your chosen location.
6. Once the debris and dirt have been disposed of correctly, you need to press the bottom of the dustbin closed which will ensure that no dirt or debris will escape for future use.
7. You can then return the dustbin to the vacuum cleaner and insert it as per the reverse of step 3 above.
How To Clean Your Shark Vacuum Cleaner
Cleaning requires a slightly different process, and three main areas need to be considered when cleaning your vacuum cleaner.
First off, take a look at the rotating brush, the dust bin, and also the filters and see if any of them need some attention.
Rotating Brush
The rotating brush will likely be one of the more difficult areas to clean and will typically be the area that picks up pet hairs.
Similar to unloading your vacuum cleaner, always make sure that the power is turned off to avoid any dangers.
In terms of cleaning the rotating brush, or any of the items for that matter, consider the area you want to clean it in and you may want to position yourself close to a garbage bag or even outside to avoid creating a mess.
Begin to remove all of the debris from the rotating brush, such as food, dust, and pet hairs. You may need to use a pair of scissors to remove pet hairs as they may become tangled in the rotating brush.
Dust Bin
Cleaning the dust bin is probably the easiest part of the whole process.
First, remove the dust bin from the vacuum as per the instructions above and ensure that you empty it before cleaning.
You can then use a baby wipe to clean the inside of the dustbin, and will only take a couple of minutes to fully wipe around the surface.
Filters
Most of the models contain a HEPA filter which is what keeps the nasty dust and allergens contained within the vacuum. The easiest way to tell if the filter needs changing is if it smells odd.
Make sure to remove the filters, and ensure that you keep a note of how and where they slot back in. It may be useful to take a photo on your phone to help you remember.
Remove any excess dirt or debris before beginning your cleaning phase.
The easiest way to clean a filter is to use warm water and give them a thorough rinse. You can also use some washing detergent, but we recommend only using a small amount; don’t go overboard with this.
Final Thoughts
Keeping your vacuum cleaner in good condition will ensure that it will perform at its best for a long time.